Atmega328p with avrdude
In this post, I will outline how to get a working standalone atmega328p. This can be done using avrdude which is an in system programmer for avr chips.
Requirements
- Arduino and its IDE (i use the uno) - this will be used as an ISP programmer
- A computer with USB type A to USB type B cable (the blue cable that usually comes with arduinos)
- Jumper cables - a makeshift programming cable
- A breadboard
- atmega328p microcontroller - the most important ingredient
- 1k ohm resistor
- Power - 3.3V or 5V depending on your clock speed, I will be using 3.3V
- Crystal oscillator (optional) - select depending on your requirements, for my project I will be using a 16Mhz crystal (clocked down to 8Mhz)
- If you are using an external crystal oscillator - 2 x 22pF ceramic capacitors
- avrdude program - Download Link
- avr-gcc - included in the software above
- make - for windows Link
- Your choice of IDE, I use sublime text 3 with command prompt
Procedure
First install all of the require software, mainly avr dude. Also make sure you have the Arduino IDE.
 |
| Check that avrdude is installed |
After correctly installing, you should be able to type avrdude into your command prompt or terminal and this block of text should show up. Also check avr-gcc by typing that in as a command and also make, you should get something like the image above.
Next plug in your Arduino into your PC and select the appropriate COM port. This COM port will later be used in avrdude.
Now go to File->Examples->11.ArduinoISP->ArduinoISP and upload this code to your Arduino.
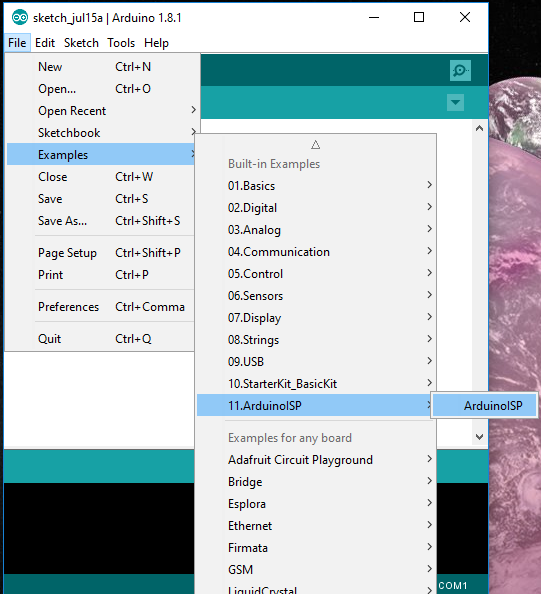 |
| Arduino In System Programmer |
This program allows you to use your Arduino as a in system programmer which is quite handy.
Once you have written a simple program in your IDE of choice, it is now time to upload the program onto the atmega. I might make a post about basic AVR-C in the future. If you don't have any code as of yet, download ledblink.c as a first program.
Link to sample ledblink.c - Credit to Howard Mao Blog, a great blog for embedded projects.
Also download this MakeFile making sure that all the files are in the same folder
Navigate to your folder location using the cd command. Usage: "cd C:\(Your file directory)"
For example my folder is located on C:\Users\opimu\desktop\project\,
then i would type "cd C:\Users\opimu\desktop\project\" into the command prompt.
Now using your IDE, edit the makefile that has just been downloaded.

The text underlined in red is what you should change depending on your setup. If you are writing in c++ then avr-g++ is required in the CC= field. Otherwise use avr-gcc.
The F_CPU field determines your clock speed. The out of the box atmega328 is default at 1Mhz therefore 1E6 should be input there.
The COM port is dependent on your system which can usually be checked in the arduino IDE as shown below. It should be the same port you used to upload the ArduinoISP program. Tools -> Port

Where the PROJ_NAME= enter your program name. In the case of the example code, it should be PROJ_NAME=ledblink.
Once all those parameters are filled in correctly, simply type "make" in your command prompt and the code should compile as shown below.

If anything other than this comes up, there's probably an error somewhere either in the parameters mentioned above or file extension naming.
The next step is to wire up your atmega328 to your arduino using the jumper cables, crystal if needed etc
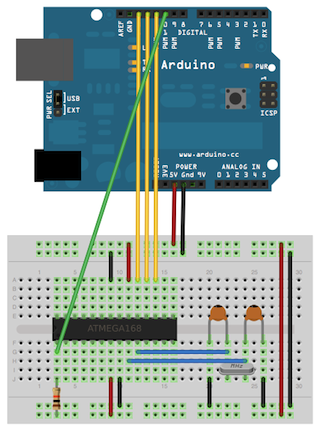 |
| Wiring diagram: Source |
Note, in this case we are using the arduino as a power supply, however alternatively, an external 3.3V or 5V battery source can be used. In my project I use a switch mode power supply or a boost converter which I will talk about in a later post.
Once you have wired up as show in the diagram above, simply type "make upload" to program your microcontroller. If the program was uploaded successfully, you should see the following text below. Otherwise check that all your connections are correct and that the atmega328p chip is receiving power.

To check that the program is working, put a 330 ohm resistor in series with an LED into PORTD 6 of the micro controller. (Check the atmel datasheet for location of pins)
That's all there is to it! Have fun using the standalone atmega328p chip which is much cheaper to buy on its own. A cheap linear regulator can also be used with a few batteries as a power supply.
My Current Chip Programming Setup
I've re purposed an old PCB that I made as part of a university course to be an easy programmer since I've designed it with a micro controller socket to easily remove the chip in case of faults and also a female pin connector with cable for easy plugging in of the programming cable.
 |
| My custom ISP programming cable |
 |
My old PCB from university, comes with a linear regulator and 9V battery socket |
 |
| How i program my chips. Note: Instead of wasting batteries, I plug my pcb into my lab bench power supply. |